Tuesday, January 31, 2012

Feeding Friendship: Winter Citrus

It's time once again for a Feeding Friendship post, or, really, past time. I had very good intentions of posting last Thursday, but I made a dish that I disliked so strongly that I didn't want to post it at all. So now it's time for a little make-up citrus!


I didn't go to Wegman's this weekend because I didn't need enough items to justify an hour in the car, but this meant that I was stuck with the local produce selection, which is somewhat awful. I had good intentions toward a kumquat and lime pie I found online, but encountered a distinct lack of kumquats in regular stores. I ended up with 4 cheerful looking navel oranges and set out to make them into something respectable. I thought about a lot of options here, but ended up with this recipe from the Food Network for Orange-Cinnamon Rice Pudding. Now, I'm not going to recreate their whole recipe, because I do not want to infringe on their intellectual property, but here are the ingredients you will need:

2 oranges: 1 for orange peel strip & other for zest
2-3 cinnamon sticks
pinch Kosher salt
1 Tbl unsalted butter
1 cup Arborio rice (Aroborio is best, but a short grain rice is imperative)
4 cups whole milk (I used 2% though)
3/4 granulated sugar
2 tsp vanilla extract
8 oz mascarpone cheese
cinnamon for sprinkling (optional)
powdered sugar for sprinkling (optional)

I realized that you get a lot of the orange flavor in this dish from the orange peel you boil with the rice, so I wanted to use a large strip for lots of flavor.


I then cut the strip in two pieces so more of it would be in the water as it boiled. You basically combine the butter, salt, 2 cups of water, rice and peel in one saucepan (let the water boil before adding the rice) and the milk, cinnamon sticks, sugar, and vanilla in another large saucepan. 


I substituted part of the regular white sugar for tangerine sugar from the Spice and Tea Exchange for an extra citrus flavor punch. 


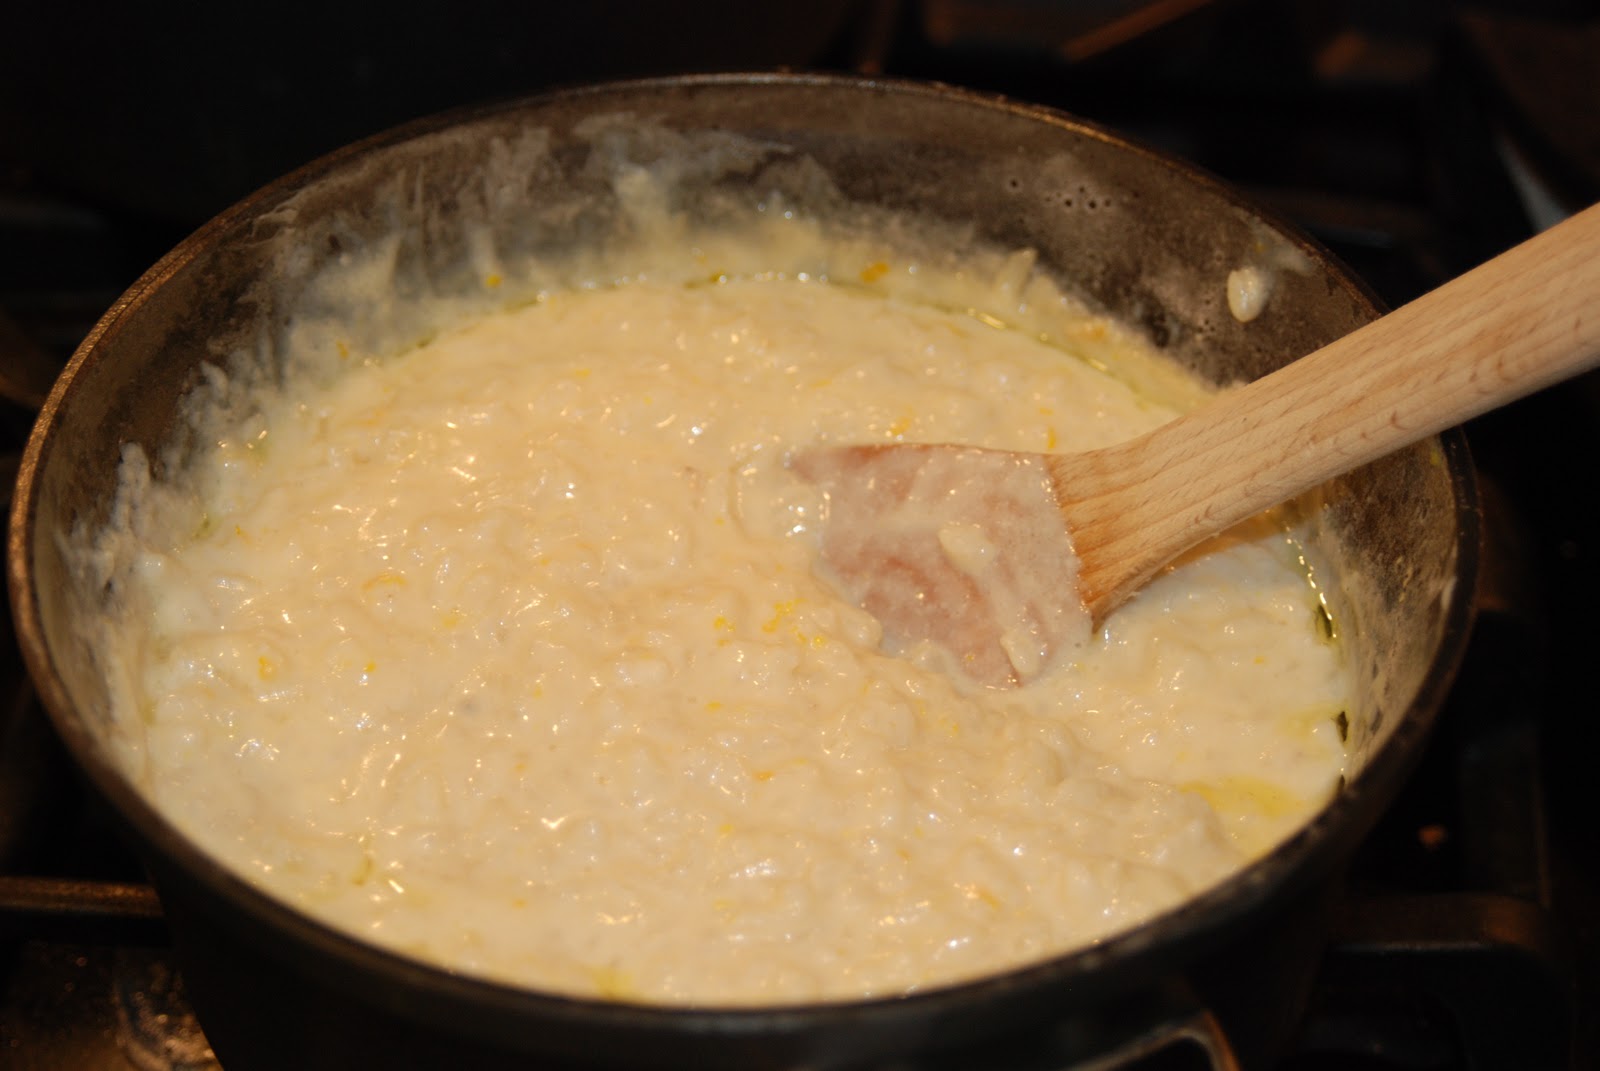
Once your rice has absorbed the water, you remove the orange peels and transfer it to your simmering milk saucepan. 

not quite absorbed yet here


I have been making rice pudding (or arroz con leche) since I got back from Spain, and this recipe is very similar to what I do, except that by adding the rice that has already absorbed the water to the already warm milk and allowing it to absorb that too, it cuts down on your chances of the rice burning and sticking. I usually start with the rice in the pan and then add milk slowly after the water is absorbed. This way is much more foolproof! Just keep an eye out for boil-overs and stir occasionally. After a while your milk will be almost totally absorbed. Now it's time to add the orange zest. The recipe called for a 1/2 tsp, but I nearly doubled it and didn't think it was too strong. 


Next, you add your mascarpone. The recipe says to add half and then serve the other half over top of your portions. This sounded strange and gross to me, so I just incorporated all the cheese into the pudding. Here you have it! 


It had a delightful citrus smell while cooking, and the taste was still subtle, coming on after you taste the creamy flavor and the cinnamon. Easy to do, and tough to burn- what more can you ask for?  


Thursday, January 12, 2012

Feeding Friendship: Greek Yogurt

Our ingredient for this challenge, as chosen by Veronica, is Greek Yogurt. I was intrigued by this choice, since I knew there would be a lot of options for what type of meal I could make, and yogurt is very good for you, but I don't eat enough because I don't like it straight up. I found lots of great ways that you can substitute Greek yogurt for sour cream in a lot of recipes, but I didn't end up doing that. I also decided that I'd made enough dessert in December for a while and that I wanted to make something savory.

I've been fairly active on Pinterest lately, and I've been using it as both a source of recipes and a good place to save recipes I find on the far corners of the Internet. (for those of you who aren't familiar, Pinterest is a place to "pin" pictures and links on a series of virtual bulletin boards and then share them in a social networking kind of way. You can follow my pins if you care- I'm sarahmk16). Some random person had pinned a slow cooker Chicken Tikka Masala recipe from a blog called Smells Like Home. This is my favorite Indian dish, and I knew that if I made it that I could control the level of spiciness. Plus, I got to use my crock pot, which is one of my favorite ways to cook since it produces such tender meat and magically has dinner ready when you want it.

Here is the link to the original recipe she posted. It made me feel good that this cook and blogger is not someone who fixes Indian food a lot, so I thought that lowered my chances of messing it up. I followed her process exactly, but made a few key substitutions. First, I halved the recipe, as she said she did. I also used 3 large chicken breasts cut into roughly 1-inch chunks because I don't cook much with chicken thighs and had a lot of chicken breasts in the freezer. I also substituted some leftover diced green chilis from a can instead of using a jalapeno, since it scared me. Here are the ingredients for the dish as I made it:

For the chicken:

  • 3 large boneless, skinless chicken breasts
  • 1/2 tbsp ground coriander
  • 1/2 tbsp ground cumin
  • 1/2 tsp kosher salt
  • 7 0z 2% Greek Yogurt
  • 1 Tbsp diced green chilis (or use 1 whole jalapeno, piereced several times with a knife)
For the Sauce:

  • 2 Tbsp butter
  • 1/2 large onion, diced
  • 3 cloves equivalent of minced garlic
  • 1/2 tbsp of kosher salt
  • 1 1/2 tbsp garam masala spice
  • 1 piece of fresh ginger about 1/5 inches long, grated (freeze first to make grating easier) 
  • 2 cups crushed tomatoes (I used fire roasted Muir Glen brand) 
  • 1/2 tbsp sugar
  • 1 1/2 tbsp heavy cream 
To Serve:

  • 2+ cups cooked rice
  • cilantro garnish (if you want) 

I started out by chopping up the chicken breasts into bite-sized chunks. I dumped these into the crock pot bowl, sprinkled in the coriander, cumin, and salt, and gave it a good stir to try to coat all the pieces with spices.


Next, I added the yogurt and combined it with the chicken evenly.


Once I stirred in the yogurt, I put the peppers on top. 


Then I got all my elements for the sauce ready to go- diced the onion, minced the ginger, and got out the garlic, butter and spices. You may want to open your tomato can ahead too, just to save time. Then I melted the butter in the pan and then sautéed the onion, garlic and salt on medium high until it started to brown. I turned the heat down a touch because it seemed like the butter was cooking pretty hard.  


After the onion looked slightly browned, I stirred in the garam masala. I thought my go-to spice store would have it, but their website doesn't list it, so I just got some at the grocery store.  


That put some scent in the house, let me tell you! A minute later, I added the crushed tomato and sugar. Stir it all up, making sure to scrape any caramelized action off of the bottom of the pan. Mine looked like this: 


...and smelled amazing. Now, into the crock pot! Resist the urge to stir, readers! You don't need to mix the yogurt chicken and the tomato sauce at this point. 


The recipe called for 5 hours on low. I started a little late in the day, so I cheated with an hour and a half on high and then 2 hours on low. Let me say that this is not a meal you're going to cook on the sly or not notice. It announces: Indian food! all day long, so it makes it hard to wait until it's done. Your neighbors may smell it too ;) During the last hour, or last 15 minutes (depending upon whether you have minute rice or not), make rice to go along with the chicken. I made 4 "servings" of rice, since you can always repurpose it later if you have too much. I had brown minute rice, but you could use just about any long-grain variety. Once your chicken and sauce has been in long enough, or you can't wait anymore, give it all a good stir to combine the chicken and tomato elements. Then the recipe said to add in the heavy cream, stir again, and cook for another 10 minutes. Honestly, I completely forgot about this part with no ill effect, in my opinion. It does account for why her sauce looks a little more orange and mine a little more red though. Here's how it turned out: 


It was delicious! It had a ton of flavor without being too terribly spicy. As a person who is a little timid about cooking Indian dishes, I was really pleased at how it came out. You should try it! 


Thursday, December 22, 2011

Feeding Friendship: Peppermint

This time around, in honor of the Christmas season and its flavors, I chose peppermint as our featured ingredient.


While there are several killer cocktails out there involving peppermint flavor, I decided right away on the candy classic: peppermint bark. It's easy, involves few ingredients, is highly gift-able and has the added bonus of involving 2 kinds of peppermint: candy canes and extract. I decided to make a big batch and my original recipe called for:

2 lbs. white chocolate baking pieces
1 cup crushed candy canes
peppermint extract

Once I got out the peppermint extract, there was another recipe for peppermint bark on the box. It only called for 16oz of baking pieces, but helpfully gives an amount of extract- 1 tsp - as well as suggesting using food coloring to make red or green swirls in the chocolate. Sooo, I ended up with this final recipe cobbled from the two above:

2lbs white chocolate
~1/2 cup crushed candy candy (1 c is too much, maybe 6 canes will do it)
1 1/2 tsp peppermint extract
~10 drops red food coloring

Start the process by unwrapping your candy canes if necessary, putting them in a baggie and smashing them to a size you'd be comfortable eating on top of candy. You may want to use a rolling pin or something less angular than my friend the hammer here, since I ended up with some fairly serious gashes in my baggie. This may just be the hazard of working with sharp candy, so crush cautiously.

crushing candy canes

I bought my 'canes in bulk

Next, you'll need to melt the chocolate pieces by using a double boiler or using a metal bowl on top of a pot of boiling water or microwaving in 30 second intervals and stirring in between. Sorry for the plethora of options there, but everyone's equipment is different. I used the bowl on a pot method and added the pieces gradually, stirring with something heat-proof to help the new pieces melt.

my crude but effective setup- won't burn your chocolate!


stir occasionally while it melts

While the chocolate is melting, get out a jelly roll pan (cookie sheet with sides) and cover it with wax paper or parchment paper. Once your chocolate has achieved a smooth, creamy state, remove from heat and add your extract. The extract is clear, so I'm not including a photo here of adding something clear to something white. Yawn.

ready to pour


When you've stirred in your extract completely, pour the chocolate out onto the cookie sheet you prepared. Spread the chocolate with a spatula until it's around 1/4 inch thick.

spreading out the chocolate- 2lbs makes most of a pan


Next came the only part I found at all tricky. The McCormick directions said to dot the chocolate with the food coloring and spread with a wooden skewer- I chose a toothpick, being fresh out of skewers. I found the spreading of the color to be a bit tricky and hard to achieve an appealing overall effect. Observe:

dotting the food coloring, per the directions

hmmm

spreading the cheer 

If this was a pan of those cheesecake brownies, I would be seriously irritated. However peppermint bark gets broken up into smallish pieces, so it's not a big deal if your color is not distributed evenly and beautifully over the surface of the chocolate. You can even skip the food coloring step, and I'm certain your bark will still appear plenty festive. I just happened to have some red food coloring burning a hole in my pantry after a recent foray into red velvet cake pops. Once your color is spread to your satisfaction (or the best of your ability before the chocolate sets up), sprinkle on the candy cane pieces you previously smashed. Lovely. You may want to press them down into the chocolate a bit to help with candy retention during the breaking phase.

sprinkle and pat down your pieces

Then, into the refrigerator goes you pan for 45 minutes or until the chocolate sets up completely. I'm sure you can cheat by using the freezer if you're in a hurry.

chilling out


Once it's set, get your pan out and break into bite-sized chunks. I ended up using a knife for this, because darn it, candy canes are sticky! I would just pick an area and slowly lean on the knife until it created a fault line and then cut pieces down from there. No need to be perfect or form squares!

breaking up the bark

Tah-dah! Now you have peppermint bark to snack on or share. George asked for seconds, and I thought it was just minty enough without being overkill. Go forth and make bark!


Sunday, December 11, 2011

Feeding Friendship: Sweet Potato

This time around Ellie picked the sweet potato for our ingredient.


Now, I'm not wild about sweet potatoes- you won't catch me ordering sweet potato fries instead of regular- but I have eaten one sweet potato dish that won me over. A couple years ago, my sister-in-law Stephanie's mother graciously hosted George & I for Thanksgiving dinner with the rest of the family. I tried her sweet potato casserole, and it was amazing. I've been thinking about trying to re-create it since then, but I hadn't given it a try until now. Now, a smart person would just ask Stephanie if her mom could give me the recipe, but I didn't do that. I reviewed all the sweet potato casserole/souffle recipes and decided that I would try out the one that seemed the most standard, but omit the nut topping and replace it with marshmallows like the one I liked.

Ingredients:
3 cups mashed sweet potato (3 to 4 large potatoes)
1/3 cup butter (I used unsalted)
3/4 cup white sugar (cut it to half a cup if you like it less sweet)
1 tsp vanilla extract
cinnamon to taste
1/2 cup milk
2 eggs, beaten (or egg beaters)
~1 cup small marshmallows

The original recipe is here if you want to check out the nut topping.

I started by boiling the potatoes for around 23 minutes until a fork stuck in them came out easily.


Once I got them out of the boiling water and let them sit just a little bit, I worked on removing the skin. It's easiest to do it while they're still warm, but be really careful since those suckers are pretty hot coming out of that pot. I actually used a dishwashing glove on one hand to protect from the heat and grip the skin better. (btw, True Blue makes the BEST gloves ever. They are fabric-lined and very sturdy) 

The method I had the best success with was to use a regular fork to remove the very tip of both ends (which were a little bit funky anyway) and then run one tine of the fork under the skin for the length of the potato skin like a scalpel. The skin should tear easily and then you can grab the "closed" side and pull the whole thing off. 

Once your potatoes are skinless, put them in a large bowl and add the butter and sugar. 


Mash the potatoes with the butter and sugar until smooth. Then add the milk, vanilla, cinnamon, and eggs. 


I just kept using my masher to combine the wet ingredients as well. Potatoes can't be too silky, in my opinion. Once it's all well combined, put it into an oven-proof casserole dish. A size around 2 quarts should do it. 


Next add your marshmallows on top. I made mine cover the whole surface pretty thoroughly, but obviously you can use your own preferred marshmallow density. 


Then it's into the oven at 350 for about 30 minutes. You'll want to check on it a few minutes early with a convection oven. Take it out when the marshmallows start to turn golden.. like this!

done! 

mmm, marshmallows 

The final result was pretty tasty! It might not have been quite as good as the original dish, but butter, cinnamon, and sugar definitely succeeded in making something palatable that I would rather not eat. 


Thursday, November 24, 2011

Feeding Friendship: The Egg

Hello readers. This time Veronica picked the egg as her ingredient, in order to use up the output of their new feathered backyard tenants in the "fowlamo." This cycle I have failed on the photo front due to some work travel and general lameness, but I wanted to share a recipe that I make all the time featuring eggs: Quiche Lorraine. Despite its delicate French name, it's a tasty and hearty quiche that can be enjoyed openly by men since it includes bacon. It also makes great leftovers that I can take to work for lunch for several days. Great for breakfast, lunch, or dinner!


Ingredients:

6 to 8 pieces of bacon
1 cup shredded Swiss cheese (or substitute cheese of your choice)
1/3 cup minced onion
4 eggs
1 3/4 cups whipping cream or half-and-half
1/4 tsp salt
1/4 tsp black pepper
1/8 tsp ground cayenne pepper (optional)
1 pie crust

Preheat your oven to 425. Cook 6-8 pieces of bacon (depending on how much bacony goodness you want) and crumble once cool (or crumble the pre-cooked variety). Make or buy a standard 9" pie crust. In the bottom of the pie crust, spread the bacon, 1/3 cup minced onion, and 1 cup of Swiss cheese (I like cheddar or Gruyere too, Swiss is just the traditional cheese for this quiche).

In a medium bowl, beat your eggs. Then add the salt and pepper and beat in the cream or half and half. Combine well and then pour this mixture over the other elements in your pie crust. You may want to put your pie crust on a cookie sheet before you pour to make it easier to transfer to the oven. Don't overfill, as this sometimes makes a little too much cream/egg mixture for your crust. Carefully put the quiche in the oven. After 15 minutes, reduce the heat to 350. Bake another 45-50 minutes, until a knife inserted in the center comes out clean. The center will puff up slightly, but will fall after you remove it from the oven. Wait a few minutes for it to cool and then slice or put it in the fridge and serve later. It keeps pretty well for several days. So yummy!

Friday, November 18, 2011

Up-cycled Chalk/Bulletin Board

The other day George and I went to brunch in Old Town on a Sunday morning. We parked on the street and I noticed some "good miscellaneous" out on the curb for a Monday trash day. After brunch I spied a large picture frame leaning against a tree and decided to take a closer look. For reference, only fairly wealthy people can afford to live in that area, and I figure if you have a million dollar mortgage and a gorgeous federal style house, your trash may be my treasure. I loved the way the paint was peeling from the frame, and it was still in possession of its hanging wire in the rear but had no glass. I declared it to be "shabby chic" and insisted we take it with us, much to George's chagrin. I had been tossing around ideas for one corner of my kitchen since we moved in, I've looked at many shelves, coat racks, apron holders, etc and never settled on anything I liked. Recently I was thinking how cute and easy it would be to do a framed chalk board with the frame of my choosing by making my own chalk board with the specialized chalk board paint they sell now. With this project in mind, I promised to use the frame or put it in the trash at our house instead. Here is the frame I found:


You'll notice it's still got a little brown paper clinging to the back, and it definitely had some cobwebs clinging to the front. The first thing it did was take it out back and give it a good rub down with a rag, not particularly caring if I knocked more paint off. At this point, I realized that under the off-white paint there was gold paint- yay! I think it adds to the vintage, shabby chic feel, and lots of people have to paint twice and sand to fake that layered look. Observe: 


Next, I flipped it over and removed all the little bendy staple things that would normally be used to press the backing into a picture frame. I used regular pliers for this. I later reflected that maybe I could have left them to help hold my board in place, but they were rusty and some a little loose, so I'm not mad that I ditched them. 


There were a few areas where the paint was really flaking and/or the wood seemed a little rough, so I took a fine-grit sand paper and hand sanded most of the frame. Since the paint didn't flake evenly, I used the sand paper to help the flaking along in a few areas. 


After sanding I gave it another quick wipe-down to remove the dust. I decided that I wanted to preserve the paint I had and prevent further chipping, so I gave the whole frame a quick clear coat of Mod Podge Hard Coat, which is intended to be used on wood, furniture, etc. (sidebar: did you know there are like 8 kinds of Mod Podge, including outdoor and sparkle!?) 


Now we come to the chalk board portion of the project. I was debating what type of material I would paint with the chalk board paint right up until I went to Home Depot. I thought about just using one of those presentation cardboard things we used to use for school projects, but once I got to HD I saw that I could get hardboard for even cheaper. Hardboard is a thin board that's hard an smooth on one side and sort of fuzzy on the other. I had them cut it from the standard size to the size of the slot in the back of my frame. It was <$5 and I didn't have to get out a saw- love it! I also picked the spray paint type of chalk board paint because it was the smallest size it came in and I knew I wouldn't come close to using a pint of the stuff. At some point during my visit to Michael's to check on the cardboard option, I decided that I might not need a 36" wide chalkboard and that having a cork board to pin coupons and cards to would be perfect right next to my mail station in the kitchen. I bought a 4-pack of 12" x 12" dark-colored cork tiles for about $13-- $2 more than their more traditionally colored cork brethren, but definitely $2 more chic and a better match to my kitchen. 


My first step to create the chalk board was to put the hardboard on a drop cloth outside and spray on 2 layers of primer, per the package suggestion on the chalk board paint. After this had dried maybe half an hour, I put on 3 separate layers of chalk board paint, letting it dry around 10-15 minutes between coats (follow package directions on whatever you buy if you're trying this). Only do this outside, because the fumes were pretty serious, even in the great outdoors. Slow, smooth, constant motion is key with spray paint- that, and a strong arm for shaking the can beforehand. Whew!


I let the board dry on the drop cloth inside overnight once it was dry to the touch- you can't be too careful with paint transfer in your house. My next problem was how to affix the board into the frame in a sturdy way that would support the cork board and future bric-a-brac. I tried hot glue around the edge in round one, but Watson quickly pointed out the flaw in using such a brittle and easily removable glue by sitting on the board and popping it swiftly away from its frame. I can always count on my furry stress testers. Then it dawned on me that I should use wood glue to glue wood. Duh. Since the frame was partially suck down by the hot glue still, I left it in place and used the wood glue around the board's edges to bind it in place. We're still on the drop cloth for this step- no sense gluing all over your table or floor. You may have also noticed from the photos that the corners of the frame are gaping a bit, so I squeezed some wood glue into the gaps in the rear of the frame to help stabilize these joints. I let this all dry overnight. On one corner the glue did escape out of the front of the frame forming a rather un-aesthetic glob which I'll need to pick/chisel off eventually. This glue seems very stable, so I moved on to the cork board phase. 

I decided that I would use the whole 12" tile width since my frame is rather large. The space was also > 12" tall, so this meant that I could leave 1 tile intact and only cut 1 side of another tile to fit it inside the frame. I used a box cutter and long level as a straight edge for the cut, because my scissors just weren't, well, cutting it. The cork will crumble all over the place, so cut on a drop cloth or something else to catch the debris and protect your work surface.

cutting the cork along a straight edge

I fit the two tiles in place without gluing first and trimmed the second tile's edge a bit for a good fit. Then I put a liberal amount of wood glue on one side of the tile and stuck it to the hardboard. I did the same to the smaller cork piece and then put random heavy objects on the corners to make sure they stuck and wouldn't gap while the glue dried. I left it overnight on my drop cloth drying while weighed down. All that was left now was to hang it up! I centered it on my kitchen wall and used a 20 lb picture hook for good measure. And, voila! 


Including all the supplies- board, cork, paints, primer, and Mod Podge- I spent $35 - $40 on the whole project. I couldn't find a framed chalk board on Etsy the same size for less, and Pottery Barn is offering one basically the same size with less character for $99! So, I now have a place to display weekly dinner options, leave notes for George, and pin up memories along with the satisfaction of having "up-cycled" a vintage frame destined for destruction. This project would work in a variety of sizes and it's easy to find framed art at Goodwill for like $2 to buy for the frame and paint.